Hey everyone! Tiny house dwellers Samantha and Robert here! We are two young professionals with full time careers and we designed and built this 204 square foot tiny house on wheels; weekend to weekend, paycheck to paycheck over the course of 14 months! We wanted this to be the best one stop location for all information regarding our tiny house! Below you will find:
- Interior and exterior photo galleries.
- 8 minute time-lapse video showing our construction from start to finish.
- 8 minute video tour of our home.
- Full 360 spherical photos that you can interactively explore
- Short but information packed description (including floor plans) that provides many links to some of the more pertinent information on our blog and should answer many of your questions.
Our free floor plans can be downloaded HERE. Thanks for following along and we encourage you to “like” us on FACEBOOK and follow us on INSTAGRAM to get our perspective of ‘the tiny life!’
SHED specs: 24′-0″ long. 8′-6″ wide. 13′-5″ tall. 204 square feet. 9,930 lbs. $30,000.00 material cost.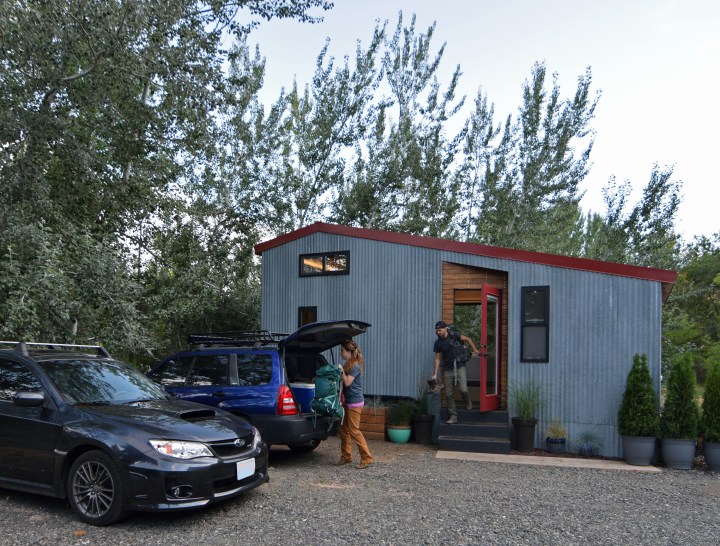

INTERIOR PHOTOS


 LED task lighting")


")


")


EXTERIOR PHOTOS


Below are some interactive full 360 spherical photos of our interior that you can clock on and explore by moving your phone our using your mouse/finger.
LOFT
BATHROOM 1
BATHROOM 2
ON THE STAIRS
OVERALL VIEW 1
OVERALL VIEW 2
ON TOP OF THE PENINSULA COUNTER
KITCHEN
Ultimately, we wanted the aesthetic of our home to represent the lifestyle it afforded: simplicity. We were drawn to the nickname ‘SHED’ because it spoke to the simple form and a utilitarian design that we sought (noun) while simultaneously speaking to the process of downsizing and simplifying (verb).
Our design was guided by some simple parameters of necessity and function that would then let the form emerge intuitively. In order to avoid any special permitting requirements when transporting our home we chose to design within the maximum dimensions of 8’-6” wide and 13’-6” tall. This first set of constraints provided us with an empty volume to which we prioritized and represented our needs in relation to the space we had available. Both the amount of actual space required as well as the amount of time spent in each space played a role in deciding how much space these tasks needed.
Placing the loft over the kitchen made sense based on similar square footage’s and that decision resulted in the highest point of our tiny home. Spaces like the bathroom and storage areas did not require high ceilings and so a single line drawn from the high point of the loft down to the lower ceiling of the bathroom becomes a longitudinal shed roof that removes the unnecessary weight and construction costs, associated with this 270+ cubic feet of unneeded volume. Additionally, the form that emerges becomes much more aerodynamic during transportation. The final tweak to the roof line comes from the need to increase the height of the entry point into the loft leaving us with this modified SHED.


We employed some unique construction techniques including the use of 2×3 framing with continuous exterior insulation that results in a lighter wall with superior thermal performance. There are some great moments in our project that incorporate reclaimed materials like our wedge entry alcove and corrugated metal siding that spent over 50 years as a barn roof in its previous life. You may be surprised to hear that our design gives up 24 square feet (of our 204 sf total) for a special, externally accessible “gear room” to hold all of our outdoor gear, which we consider essential tools to our health and happiness. And if you want to see what we are able to achieve with that outdoor gear you may be interested in our WANDERLOVE photo gallery that documents all of our adventures outside the four walls of our tiny house.
We also have an amazing construction gallery that contains hundreds of photos and edited time-lapse videos of the entire construction process as well as a gallery that contains all of our finished photos. If you have questions about some of the items and appliances we used in our home you may find the answer on our RESOURCES page.
And finally, if you don’t want to sift through our numerous blog posts and wished there was a single, condensed, organized and beautiful package that presents our thoughts and construction progress in chronological order, look no further because that 145 page digital download package exists! We have titled our do-it-yourself tiny house memoir “Built With Our Hands” and it is available for purchase below or over on our RESOURCES page.

Sample page spreads from our e-book: 


