

Ever have one those weekend projects turn into a multi-month project…? Yea, us too.
It wasn’t until I began to finally compile this blog post that I was able to grasp the entire scope of this eighteen month long project that began before our second child was ever conceived and is just now finished as he begins to crawl.
In fact it feels like every project we do inside this 107 year old home begins growing exponentially for a variety of reasons. This project we are about to share with you technically began when we bought this house, two and a half years ago, before we were pregnant with our second child, before any of us had ever heard ‘COVID-19’ and really before we even knew exactly what we were going to do upstairs, but we began tearing up the old carpet, tile, bathroom fixtures, etc… in our free time knowing that change needed to happen.


This project is also a story of dedication and collaboration between us and the company we chose to make the tile, Mercury Mosaics. You may remember that company name from THIS PROJECT when we purchased their tile for our kitchen back splash feature wall (#spanishmoss for the win). That small project was the perfect opportunity to test the waters and after the finished result it was clear that we could not settle for any other tile when designing our bathroom and soak nook because of the intricate details we wanted to incorporate into the project that would require a company capable of doing complex custom work.
This project spanned some of the most trying times for both us and Mercury Mosaics as we navigated a global pandemic, civil unrest, family death, the birth of our child, and now as I took many of these finished photos, smoke so thick and air quality so poor here in the North-West that we are once again, totally quarantined inside. (which makes us all the more thankful to have such a beautiful little retreat to relax in now.)
If this sounds more like a friendship between two individuals rather than a project between a business and architect, that is how it felt and I value the personal nature in which Mercury Mosaics conducts their business and I can confidently say that they are the most detail oriented and professional business I have ever dealt with both personally as a (recovering) perfectionist and professionally as an architect. I’ll stop gushing here but encourage you to read on to see and learn more about this bathroom renovation and how they worked efficiently to create our one of a kind tile mosaic.
At some point last September, Samantha broke the news to me that we would in fact be expecting another child as we hoped and per usual my excitement was quickly encroached on by thoughts of our gutted upstairs and all the things we needed to do before he was born. It wasn’t that we were uncomfortable in our one bedroom, one bathroom scenario downstairs (our previous residence WAS the 204sf SHED tiny house after all) but with another family member comes the need for a bit more space and a lot less free time to accomplish those renovations.
Immediately, walls started coming down, the sub-floor started coming up and we began dismantling the bathroom while assembling a vision for the space. The idea was pretty simple, re-arrange the small 64 sf bathroom and create a simple and timeless space using quality materials while adding a ‘soaking tub nook’ just outside the bathroom in an unused corner of the bedroom; a sort of hybrid space that is close enough and related to the bathroom while being freed from its confines.
I’m going to do my best to make this a coherent posts but the eloquent wording and carefully compiled photos of yesteryear are gone…we have two kids now and our already limited time is stretched even further yet we remain dedicated to sharing the process behind the polished end result, if not for educational purposes then to at least let you know that we too struggle and put in a lot of work on these things. For clarity sake, this project is composed of two adjacent sub-projects that I will be referring to as the ‘soak nook’ with the free standing tub and then the ‘bathroom’ where the shower, toilet and sink are. We’ll cover the soak nook first and then head into the even more challenging bathroom renovation.


SOAKING TUB NOOK RENOVATION

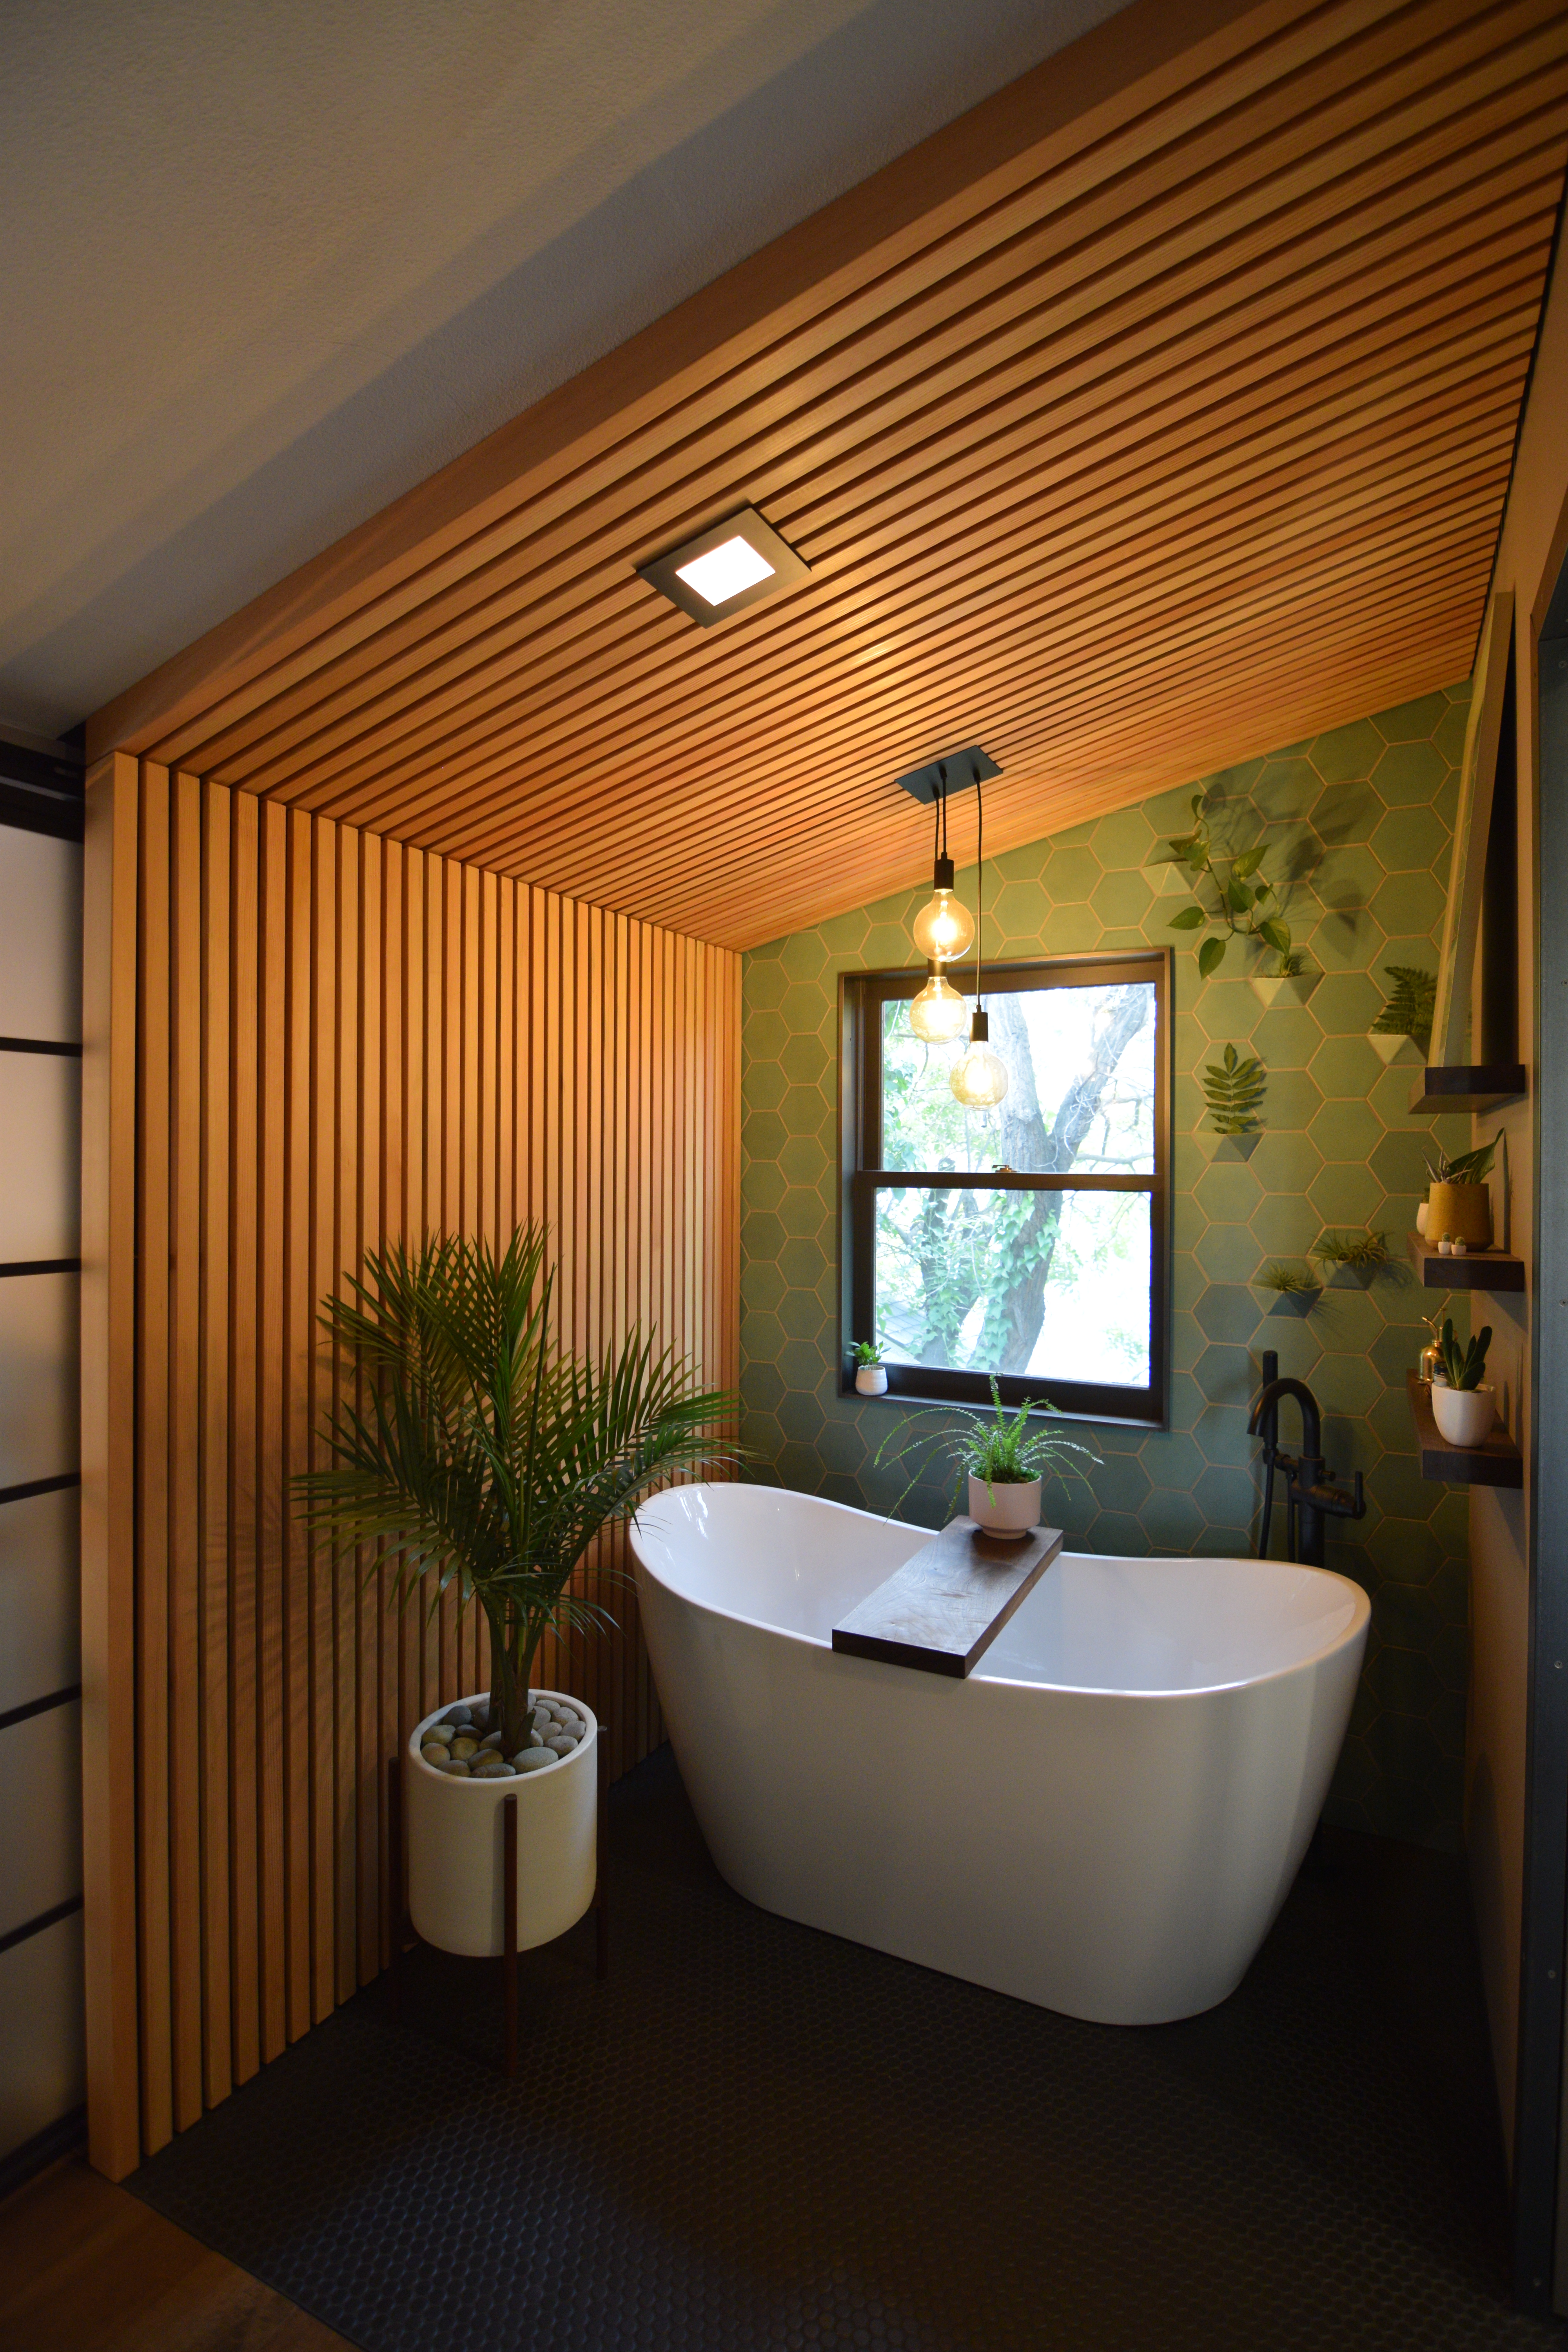
Every project has a focal point that anchors the design and experience and for this renovation it quickly became all about the tile as we chose not to do small accents but rather floor-to-ceiling murals that at a glance looked elegant and simple but upon closer inspection revealed subtle and beautiful details. This is where we began the conversation with Mercedes, founder and owner of Mercury Mosaic, where she quickly expanded our horizons on what was possible and once again entertained our multiple sample requests as Samantha and I worked towards a mutually loved option. For the soaking nook, which would consist of a modern free standing tub accompanied by a wall to ceiling slat-wood installation and matte black fixtures, we came back to the unique Mercury Mosaic tile option we always loved and almost used for our kitchen backsplash; 913 ‘Old Copper’ in large hexagons. I want to think that this would have been the perfect feature wall as is, but then Mercedes brought our attention to their one of a kind, TILE PLANTERS and it was a home run. These tiny little custom planters add a three-dimensional protrusion capable of holding all sorts of little plants on your wall and add the touch of texture and uniqueness to make a project truly one of a kind. You can never have too many plants around the soaking tub!


So with Mercury Mosaics fulfilling that first order, we stepped outside to see that our RUSTICA custom barn door had arrived. We custom ordered this door to close off the large opening at the top of the stairs, entering our bedroom and adjacent to the soak nook. As I stood in front of the giant crate that held our new steel and glass door a thought that should have been considered before ordering crept into my mind; would it even fit up the stairs? An I’ll fated attempt by a friend and I confirmed that no, it would not fit up the stairs and any further attempts definitely needed more than two people.
After removing the corner post at the stairway bend, a second attempt with three people again failed when we got to the top of the stairs and ran into another handrail obstacle that I was willing to carelessly cut out right then and there but the door was too heavy for the remaining two people to precariously hold at the top of the stairs while I grabbed a saw so we took the door all the way back down, nearly shattering it in the process. Some more subtractive interventions to the stairway handrail allowed a third attempt with four people to be successful and we were finally able to install the 35 square feet of steel and glass onto the low profile track and see it smoothly slide into place. We officially had a bedroom door, and it still allowed the bright southern light from the stairway window to make its way into the bedroom when closed! (I’ve attached a low quality video copied from our PERSONAL INSTAGRAM that shares this process pretty well, see below)


It was shortly after our son, Torin Cade, was born that a pallet of tile arrived and Samantha became a renovation widow of sorts as I transformed into a tile elf for multiple days straight. Using a borrowed tile saw [although THIS ONE has worked well for us in the past] sat on the floor with a make shift splatter tent constructed over it the time passed slowly as I shifted focus from the micro-details of cutting a singular piece of tile to the macro details of the overall tile aggregation of the feature wall. Pro-tip from a recovering perfectionist: When constructing a large aggregation (assembly composed of many smaller repetitive pieces) like this tile feature wall or the up-coming slat-wood wall, you have a lot of room for mistakes. The small inconsistencies, misalignment or off-coloring of a particular piece that may seem like a big deal at the moment will get visually consumed and smoothed over by the time the entire aggregation is complete. Projects like this are tedious and time consuming to do but the results are always very aesthetically pleasing; there’s just something with the human brain that loves when a surface is actually composed of many smaller individual pieces that keep the simplicity of a single plane intact while introduce subtle texture, complexity and repetition.
We even took a page out of our tiny house design book and again used industrial steel angle as trim around the pocket door between the soak nook and bathroom. Besides enjoying the aesthetic, using steel angle on each side of the pocket door opening significantly strengthens the thin wall edges adjacent to the interior void in a high traffic zone resulting in a rather elegant but extremely functional application of an inexpensive industrial product. (Swipe to end of the slide show below to see photos of the steel trim process).
In each successive stage of this little soaking nook, from the modern barn door, to the tile feature wall, to the thick slab walnut accents we felt more and more proud of this space; but it wasn’t until we added the wall to ceiling slat-wood ‘wrap’ that I stepped back and couldn’t believe what we accomplished. It took some effort to turn that vaguely worded idea into a designed and detailed plan that could be executed by a couple of d.i.y.ers but when we lifted those panels of perfectly spaced vertical grain Douglas-Fir into place even I couldn’t believe the warm modern minimalist Scandinavian sophistication it brought to the space immediately.


If you’re wondering about that piece of custom art on the top shelf, we would love to share a little bit about it. Jackie Jones of JONESANDWEST.com is a Austin, Texas based designer and artist who we met when she was living up here in Yakima, WA. In the last couple of years we have watched her develop this beautiful series of charcoal lunar phase drawings in which we were able to choose a date that was special to us and have that exact moon (phase) rendered in charcoal to remember for ever.


Process photo above borrowed from her INSTAGRAM.
The particular date we wanted to memorialize was July 15, 2008, a prominent day during the most formative trip in our shared journey [and long before the formalities of our wedding day.]
A small personal interest in photography back in high school led to the discovery of Ansel Adams’ black and white landscape photos of the American West and more particularly his documentation of Yosemite’s half dome. A half decade later I had the opportunity to fulfill a personal dream of standing atop that iconic rock formation thanks to the help and commitment of a relatively recent friend who signed on for a month long road trip around the country with me. With thousands of driven miles behind us (we started in Buffalo, NY) and guided by the 4:00 am moon leaving camp, we embarked on our longest day hike to date to which the distance and elevation [gain] stats still holding personal records and we shared our first [of many] summits together.
It was that trip and particular day that I learned two things; anything is possible with the right partner and that Samantha was the person I wanted to spend the rest of my life with. We have accomplished many great things and have countless unforgettable experiences in this shared journey of ours, but I have and always will consider that trip the greatest, most formative and important of my life and our relationship; just a couple of 21 year olds on the run. The moon that illuminated the trail that early morning now has a spot in our home forever thanks to the incredible talent and effort of Jackie.


BATHROOM RENOVATION


While that spa nook was a really beautiful use of an ignored corner of the upstairs bedroom, we still needed a complete bathroom, and choose to conduct our most ambitious tile installation here too, of course.
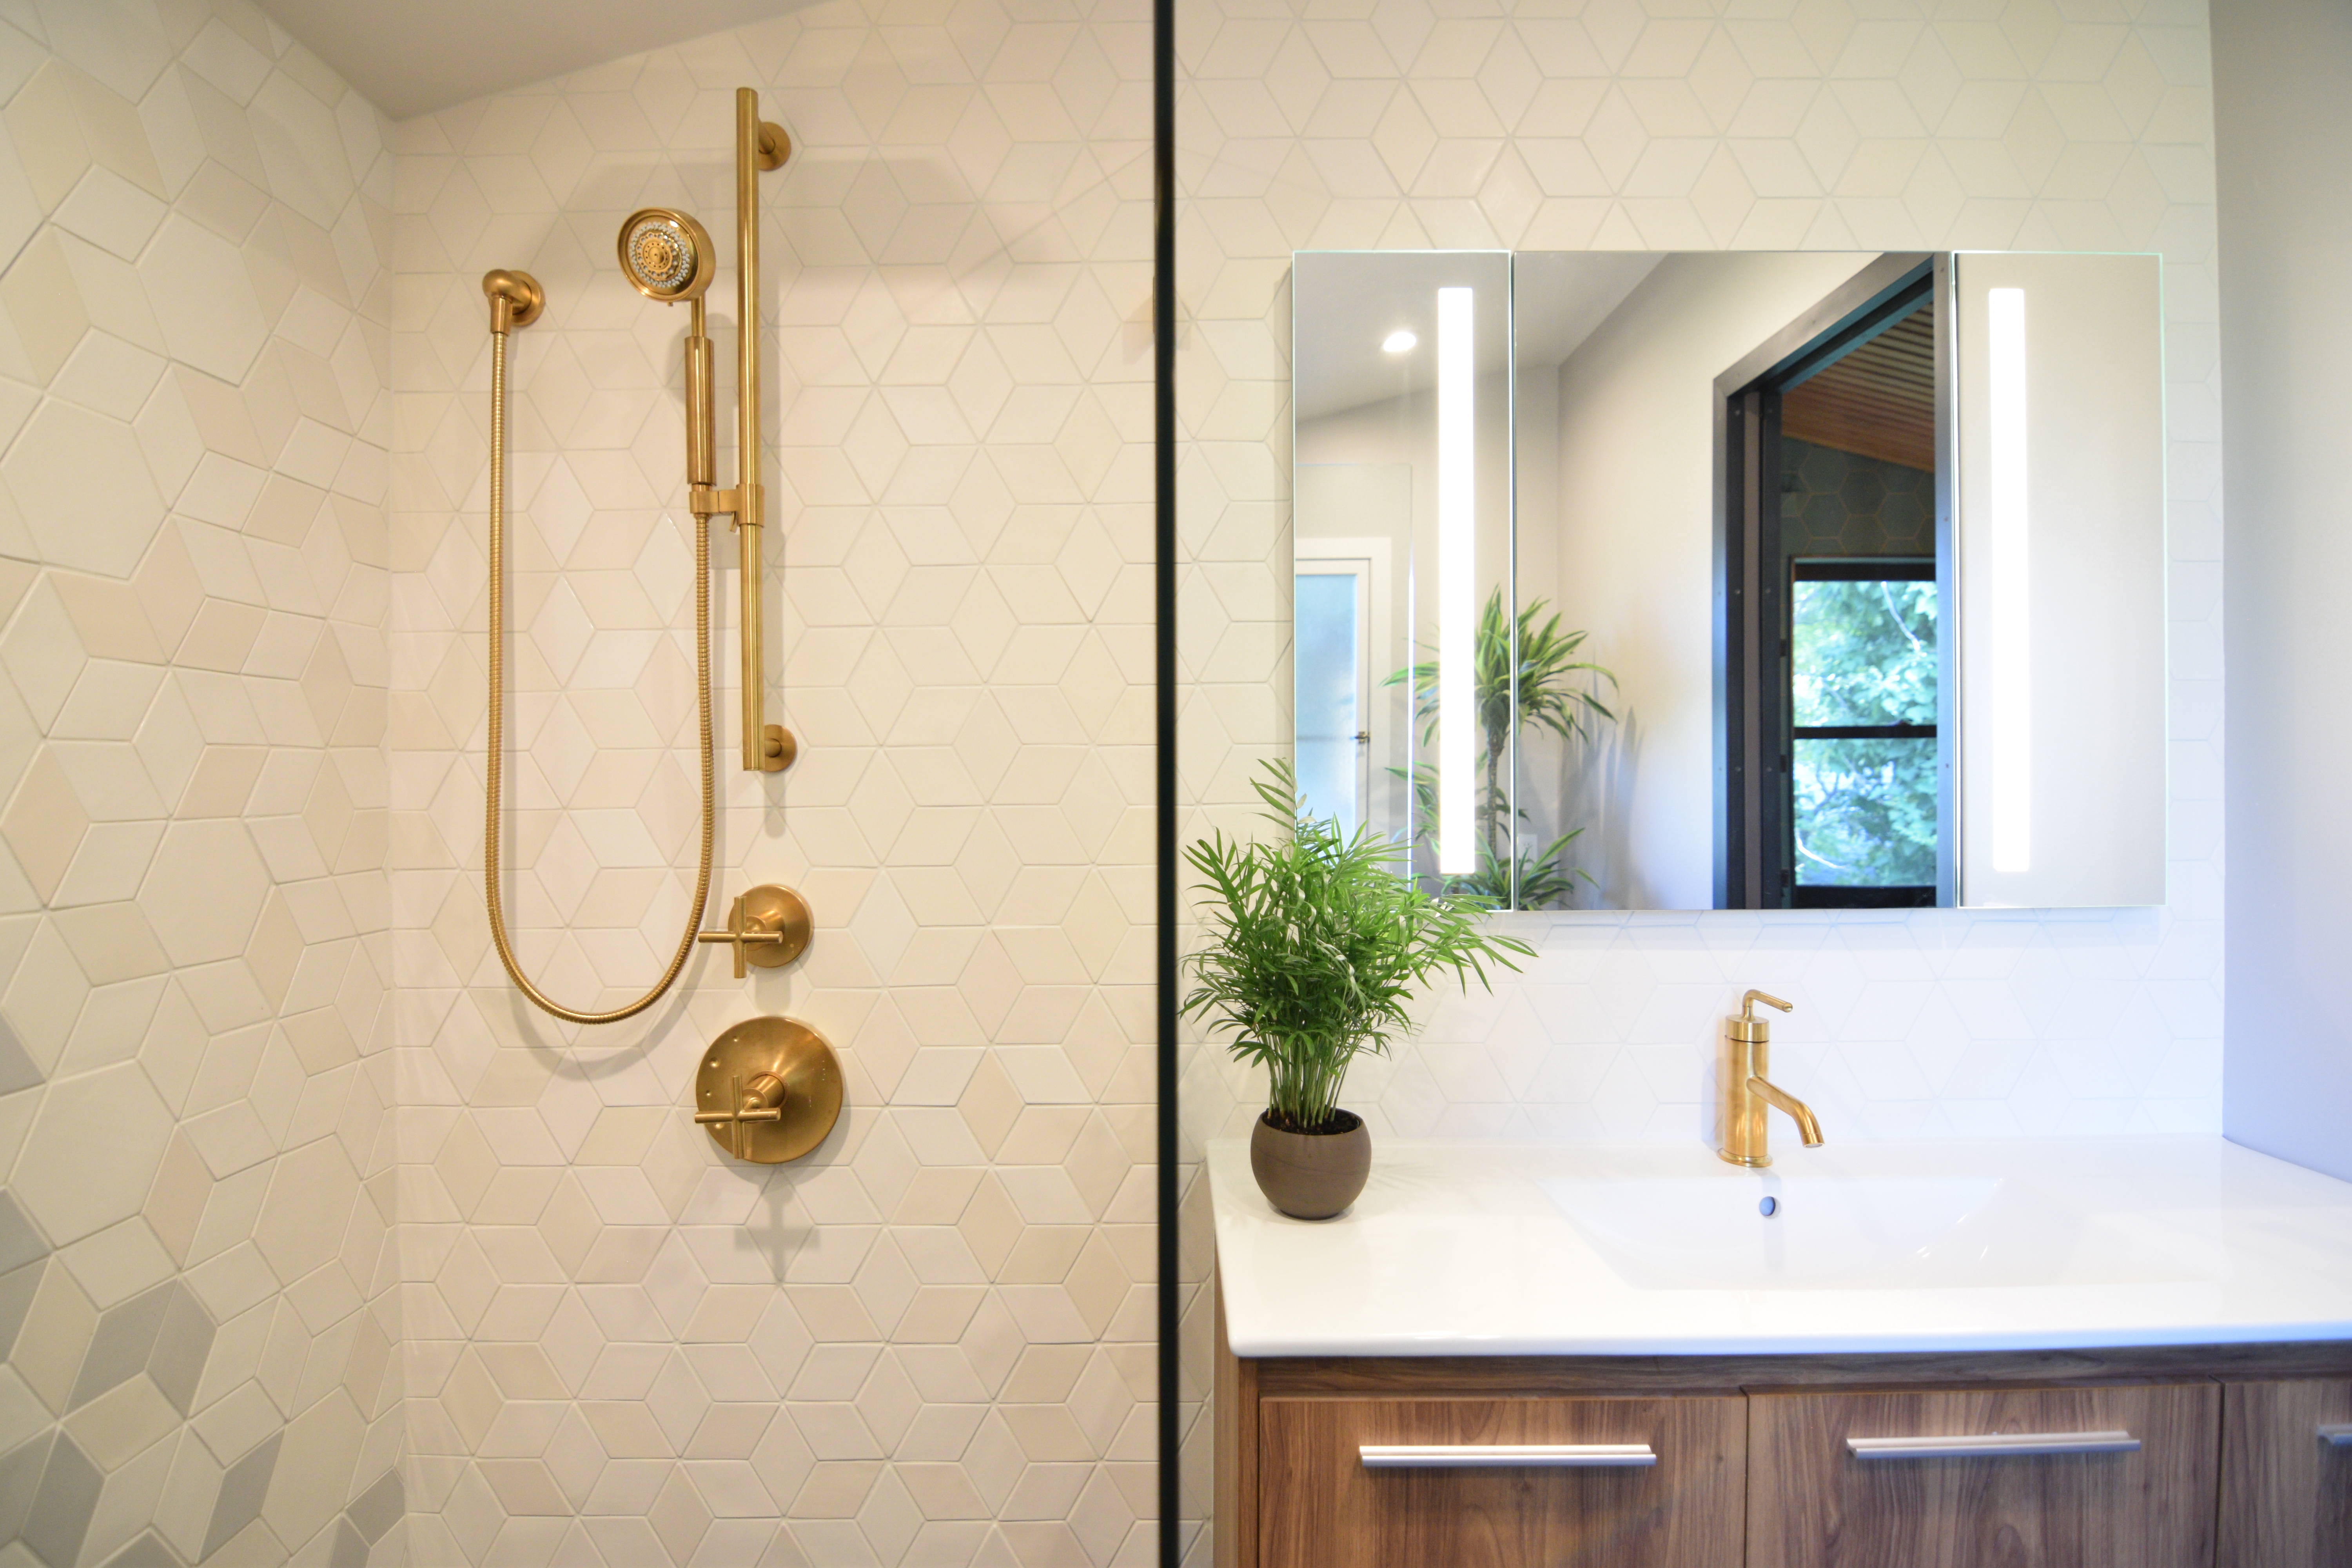
At less than 8′ x 8′ our master bathroom is small by today’s standards so we wanted to take a minimalist approach to the design and detailing of this project to minimize physical and visual barriers and clutter so it felt as open and large as possible. The three main components to this were a truly curb-less shower, frameless glass and floor to ceiling tile. Aiding in the goal was a pocket door that hides in the wall, a floating (wall mounted) vanity and recessed medicine cabinet with integrated LED lighting; all items that provided important functions in a clean, compact and efficient package.
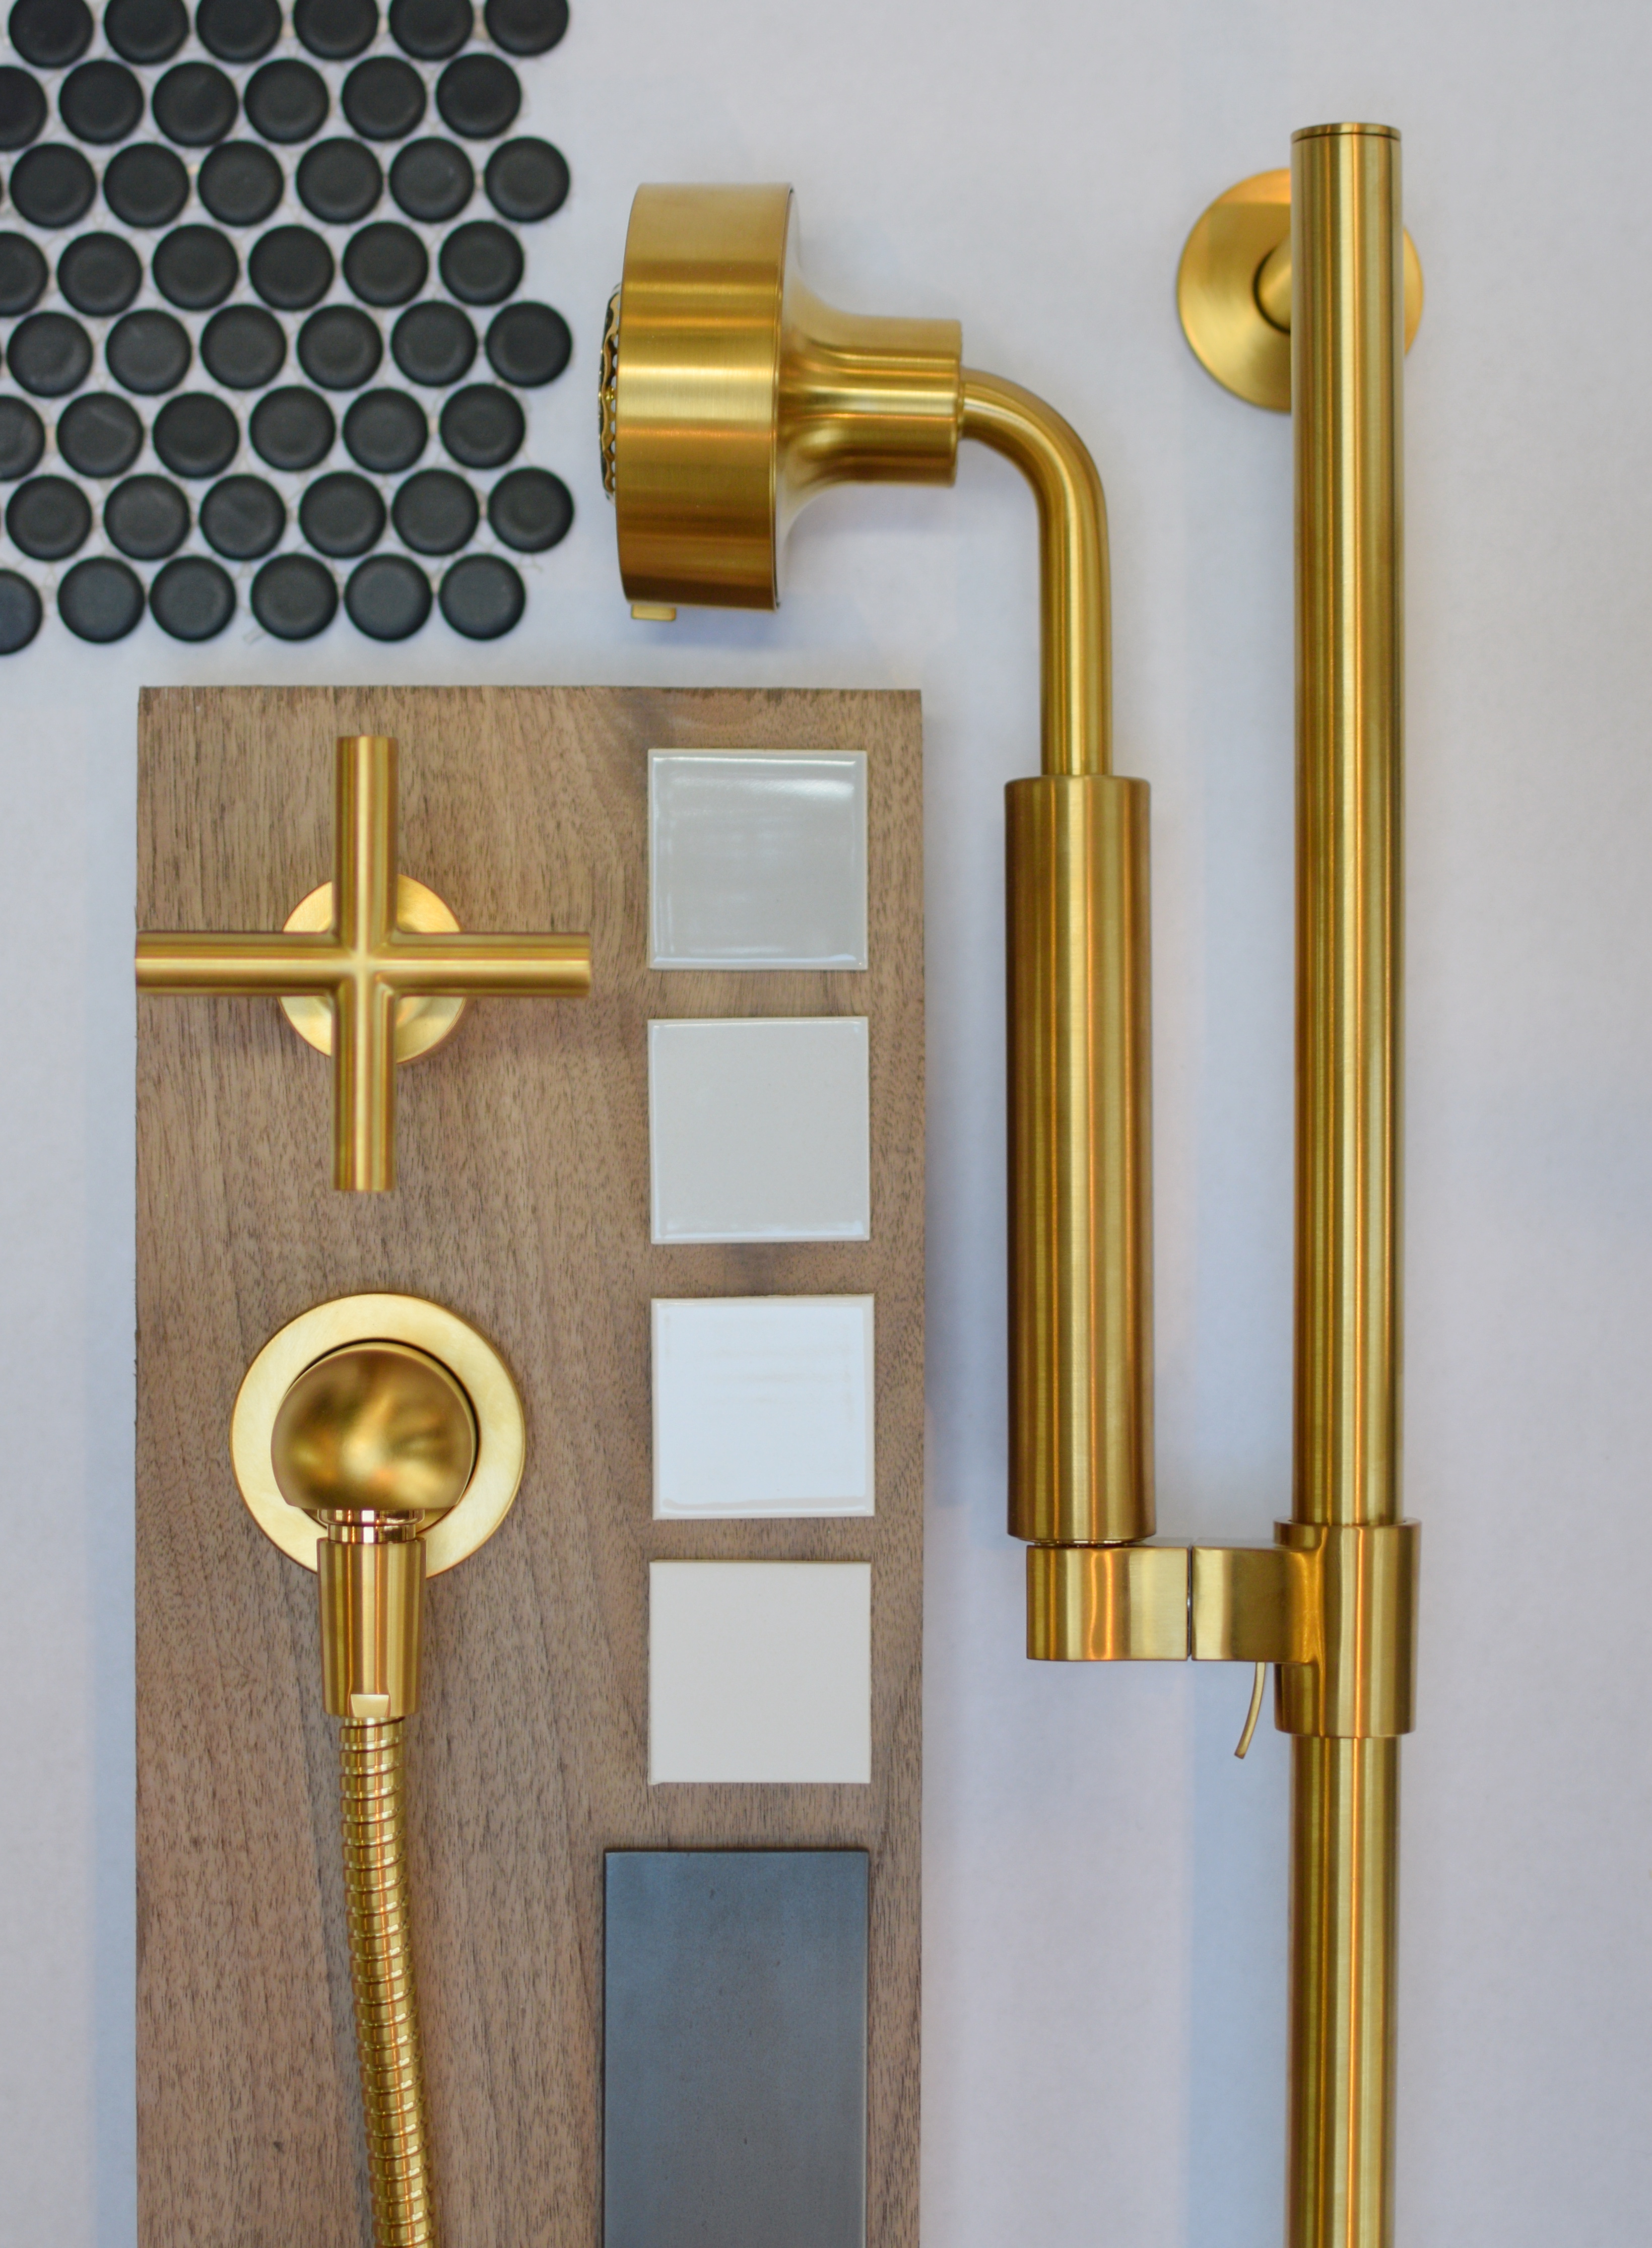
The simplicity of our approach would then let our one of a kind tile design really shine. We threw a curve ball at Mercury Mosaics and they knocked it out of the park. By design, the tiled walls appear simple and elegant from afar but reveal layers of complexity as you experience them. A single continuous mosaic would wrap three entire walls of the bathroom and evolves in three ways from left to right; it evolves from grey to white using four different tile tones, it evolves from a large hexagon geometry into medium diamonds and it evolves from a fully gloss finish on the left (grey shower wall with shampoo niches) to a completely matte finished tile on the right (behind the vanity). This transition happens gradually and therefore required varying quantities of seven different tile types. It felt like it would be a nightmare to pull off but Mercury Mosaics made it pretty damn seamless, and its why my previous claim that they are the most detail oriented company I’ve ever worked with holds true; they really shine when challenged with an idea.


TILE DETAILS
- 913 Old Copper (Matte) in the soak tub nook
- 60 Silver Linings (gloss)
- 77E Grey (Gloss)
- 11 Deco White (Gloss)
- 301 Marshmallow (matte)
OTHER DETAILS
- Fixtures are Kohler ‘Purest’ line in “vibrant moderne brushed gold’
- Bathroom mirror is by Kohler – ‘Verdera frameless medicine cabinet’
- 59″ x 29″ Freestanding acrylic tub by Woodbridge
- Vanity w/ ceramic top is Oren Ellis – Lanz 48″

The process seemed daunting in my mind but the team at Mercury Mosaic really took our vision and turned it into reality with very little effort from me and proved that teamwork makes the dream work; from design and layout, to hand making and glazing the tile, to QC and sheet assembly to final organizing and packaging with concise labeling, it took nearly twenty different people to digest, create, assemble and package this project followed by one very slow and often tired father to install it.
After confirming that they were capable and happily willing to create a custom 115 sf, tile mosaic mural that wrapped three walls and spanned from floor to ceiling, I sent them a .PDF of our intended design. They then translated that to tile, creating the appropriate number of each of the seven different tile shapes and tones (+ adequate overage) before laying it out to ensure design satisfaction. At that point they then carefully assembled the tile into easy-to-install meshed back sheets, numbering each sheet with an identification number (A1, A2, B1, B2, etc… and then organizing the sheets in ascending order into labeled boxes that correspond with a printed diagram clearly indicating the location and order of installation for the sheets. (If you missed the video at the top of this blog post, head back up and watch it to see this process unfold in time-lapse)
When the tile arrived we just carried the boxes upstairs, stacked them in order based on the labels that indicated exactly which sheets were inside each box and began to open them one by one to reconstruct the entire mosaic on the floor before installation to ensure everything looked good and would have proper coverage. Mercury mosaic even cut the bottom tiles where the installation meets the floor and select wall edges to ensure a seamless corner wrap at the corner bench while allowing the tile to run-over length in the other dimensions so that it could be cut exactly to the walls dimensions on-site, avoiding any miscommunication or installation tolerance issues that could result in not having enough tile. This operating procedure on their side and my willingness to go through the extra effort of a dry layout prior to install allowed me to identify a location on the shower head wall in which the vertical alignment of the valves and slide bar would not be centered on the tile layout and allowed me to shift the entire wall layout nearly three inches to create the perfect alignment, including placement of the diverter valve right in the center of the a tile starburst!


And while I may be a design professional, I’m not a professional builder so it was really cool of them to take the time to explain some options I had for circumstances I had not considered, like edge and corner finishing options when tiling the shampoo niches and dealing with all of the 90 degree corners (because my decision here would determine whether they needed to glaze particular edges on certain tiles or not). We ended up choosing to miter the tile and install it using the new Schluter-FINEC corner profile which maintains a thin but robust metal corner protection, in a textured matte white that matches the grout of course.


I’m going to spare you the pages of intricate details it took to make this happen but do want to touch on some of the larger points in the following paragraphs. In order to achieve a curb-less shower we had to first cut down the existing floor joists in the shower area 2″ and then reinforce them with additional joists sistered to each side before installing a new subfloor and high-density foam shower former to achieve the proper drainage slope. This allowed a single uninterrupted plain of floor tile to continue from the bathroom floor into the shower where it then begins sloping to the drain. To accentuate this barrier-less moment, we choose frameless shower glass that removes any visual interruption as the wall and floor tile seamlessly flows from the vanity space of the bathroom into the shower space.
The Schluter waterproof membrane extends out from the shower to protect the entire bathroom and spa nook area beneath the penny round tile. We completely removed and reframed the vanity wall (which separates the bathroom from the bedrooms reach-in closet) using new 2″x6″ lumber to ensure enough wall depth for the new plumbing and adequate structure to hang the ceramic topped floating vanity from as well as securing the 3/8″ thick shower glass to (being sure to reinforce those particular areas for added strength.
The shower utilizes a ceiling mounted rainfall shower head and a wall mounted hand shower on a slide bar which can be removed to rinse down the tile or glass after cleaning it. The rainfall showerhead was kind of a shot-in-the-dark as we had never used one before but it seemed like a fun idea and we are thankful to have committed to it as every shower now ends in luxury, rinsing off under and enjoying the perfectly vertical rainfall.
I have a hard time gushing over something like using a bathroom as I am a pretty utilitarian person but the experience of these spaces still has us saying ‘wow’ after each use; a result of successfully amplifying an everyday function by letting the experience break free from the typically cramped enclosures and be apart of the entire space. When the quantity of details is minimized, the quality of the details really shine. Less IS more.


Seeing as we are on this bathroom renovation thread, it’s time for us to address the one downstairs…send coffee!

Oh, and here’s our newest addition, Torin Cade, who just turned 5 months old!


Categories: Uncategorized

Excellent post and incredible results!
Those tile planters are. just. brilliant. Oh, I love them! I’ve never come across anything like them. So very clever! Thank you for sharing- feeling inspired!
You and your STUNNING home renovations. This bathroom transformation is hands down the BEST i have ever seen. The back story to the lunar artwork was a wonderful addition to this post. HUGE high five to you and the fam for sticking with and successfully accomplishing such an incredible new space to your home.
Absolutely stunning renovation (yet again)! In awe of not just the final product, but even more so knowing all the prep work that went into creating an empty and fresh (plus solid/sturdy) template. Without a doubt this was the BEST bathroom transformation project I have seen. The background to the moon art piece above the tub was a lovely and sweet addition, glad you included that. We are currently building our second home, and anytime I feel overwhelmed I think how much work it would have been to renovate instead (although the charm and re-use of en existing building is special too!). Big high five to you and the fam for sticking with this year and a half reno project. The end result is surely being enjoyed and appreciated to the fullest :).