Things have been a bit quiet over here at SHED tiny house and quit the opposite at the 106 year old farm house we are remodeling. The tiny house has been a welcome, quiet and clean respite at the end of long work days and I am equal parts thankful for its current role and regretful that it has been reduced to such at the moment. I wish we could better enjoy these remaining weeks, and the last few months for that matter but renovating an old house is a time consuming task and we want to get as much done as possible before moving in to reduce the amount of construction happening on the main floor after moving in, the process of which has already began.
This is a pretty emotional transition that will be granted its own blog post in the near future but we are excited to see how our tiny house can give back to us, our friends, and strangers in a new way.
The good news is there has been an incredible amount of work done on our new home and the bad news is there has been very little process documentation which may be preferable for those not fascinated with the nitty gritty, tedious and laborious process behind the final polished images. We just don’t have the time and energy to document the process as much as we’d like. When you always feel like you’re on a time crunch, have a toddler running around, both work and are still trying to get out and live your life, the first casualty is the storytelling, no matter how much you enjoy doing it. So here is a meager attempt at recapping a crazy few months of progress in preparation for our official departure from the tiny house.
If you haven’t yet, check out THIS BLOG POST about how we fell in love with and acquired this 106 year old home and THIS BLOG POST to see how quickly and extensive the remodel became.
Shortly after the last round of photos from THIS POST we made a hard decision on counter tops. It was less of a hard decision and more of a hard pill to swallow. In my naivety I had assumed that quality counter tops for a small 10’x10’ kitchen could probably be acquired for a thousand bucks or so. I couldn’t have been more wrong, and after sifting through surprisingly comparably priced solid surface, granite, and quartz we choose the later of the three and paid many times more than my uneducated assumption; exacerbated by our request to have them vertically wrap the edge of our peninsula bar and terminate into the floor. This wasn’t the first or the last time we’ve found a way to justify an unexpected expense because we both believe that this house deserves a quality remodel and we only want to do it once and do it well so that we can simply enjoy it for the next however many years.

We put down the deposit and the professional came to measure the counter top template. This was our first time dealing with a counter top professional (we made our tiny house counters out of plywood) and I riddled my mind with all of the things that could go wrong before the template guy came; what if my lay out wasn’t perfectly square, or level, or plumb, because this house is none of those things. Would they scoff at our IKEA cabinets? Could the IKEA cabinets support 3 CM thick quartz counter top? After all It’s probably not every day that a home owner puts one of the nicest counter top options onto what many (incorrectly) seem to consider low quality cabinets and if we are being honest the former probably wouldn’t be obtainable without the later, financially speaking. Either way, I knew there would be two weeks in-between the template creation and the actual install which would be plenty of time to tweak and correct any issues in the base cabinets.
He set up unique tripod device with an electronic ‘pen’ instrument connected to the tripod via cable and ran the tip of the instrument around all the walls and cabinet edges and even the perimeter of our farm house sink. It was then that I realized how exact this process was, to the point that the counter tops would be cut to the exact, slightly irregular shape of our unique clay fired farm house sink. He finished his visit with some words that would leave me worried once again for the entire two weeks until the counter tops were installed; ‘Now make sure you don’t move any of these cabinets at all.’
‘Shit’ I thought to myself while simultaneously giving an assuring nod as if to say ‘right, of course not.’ I had planned on adjusting the height of where the counters connected to the wall and doing a final double check on the levelness of the cabinets, made easy by the adjustable leg plinths of IKEA cabinets which work really well if the floor of your 106 year old house isn’t level. Even if I didn’t conduct those tweaks, I still needed to move the cabinets to get the protective cardboard layer out from under them before the counter top weight was applied to the cabinets…
With much hesitation I decided to just go for it and do all of the planned alterations while removing the cardboard. All of the counters were completely removed and then put back in what I hoped to be the exact same location as before, aided by little marks drawn on the wall. Only time would tell if I was able to perfectly match the original lay out to the fraction of an inch, as measured by a machine.
The counter top arrived a few weeks later with a two man install team on what would be the most stressful day of the remodel in my mind. There is something about having work done on our own house that is not being done without your own hands that is hard to cope with. And yea, I was definitely worried about counter tops worth twice as much as the vehicle I drive not fitting correctly because of my own actions.
‘huh, that’s weird’ the install team mumbled as they stood over the sink.
My heart sank. The counters were off by ¼” of an inch, left to right. If it was any other cabinet location, they could be hip-checked in the needed direction to create wiggle room but the sink cabinet was unique; a standard 30” wide IKEA cabinet that had been cannibalized into a custom 26” wide cabinet made to fit a unique sized apron front farm house sink. The remnants barely resembled anything from IKEA and I had added additional screwed-in-place support below that was then covered by a glued in place custom panels on each side. This cabinet wasn’t moving anywhere and any movement of the sink would lead to non symmetrical ¼” spacing between the sink side and the custom paneling, an occurrence that would drive me crazy for years. In a quick thinking problem solving manner the installer saw an opportunity to cut back the ¼ backsplash backer board so that the counter could slide under it a touch to re-align the sink and all was right in the world.
I tipped the installers a couple twenties and thanked them for doing a great job; they will never know how appreciative I was that they were able to remedy a situation that I silently created. They pulled out of the driveway and I stood in the middle of the kitchen, elated with the results and thankful that the floors and the counter tops of this remodel were done. In my eyes, the rest would be easy, and would be done by us.


While the rest has in fact not been easy, it has been done by us and that is how we prefer it. I can’t imagine simply adopting a home as our own and being content. Even the idea of paying others to come into our space and do the work when absolutely necessary is a difficult proposition. For us the sense of home and belonging and pride is something that is cultivated through time and effort and hard work and the lessons learned from failure are valued as much as the pride felt from the successes.
There have been some really hard days where giving up crossed my mind despite not being an option. It can be hard to see how far we’ve come on the project when sometimes all I focus on is how far we’ve got to go still. It is in these moments that our experience building the tiny house translates most handily to this much larger project. It’s a helpful reminder to know that I’ve been here before, in the depths of a complex and tedious task, with aching muscles and sawdust in my eyes, duct tape bandages on my fingers and blisters on my hands, and that it all works out in due time.
Many nights after I spent all day with Aubrin, Samantha would come home from work and I would head over to the new house to try and put a dent into the laundry list of tasks we wanted to accomplish before moving in. I would work until the wee hours of the next morning and then shower off the debris, drive back to the tiny house and try to sneak into the tiny house/bed without waking up Aubrin. A few hours later my alarm would jolt me back awake and I would quietly make my way downstairs to start making coffee before Samantha headed back into work and the process would repeat itself. There were a couple really hard months as of late that I don’t know if I ever want to replicate again in my life but as you’ll see in this post we do have something to show for it.
After building the tiny house we went months at a time without stepping into a hardware store and the thought of doing so would induce anxiety laden memories of long hours accumulating a cart full of items as we learned what we needed on the fly by consulting the googleverse. By the time we bought this house it was exciting again to be exploring the furthest reaches of Home Depot and be learning through experience again. Fast forward 8 months and we are once again known by name and those sometimes twice (and even thrice) daily trips are much more of a nuisance than an excitement, not to mention costly.


I’m not sure how I made it to 32 years old without ever paying my dues to the drywall gods but my time finally came to tape, mud and sand a section of wall around the opening to the kitchen that required a lot of outer corner finishing and a unique new-drywall-to-old-plaster interior corner condition that I needed to find a solution for. I was worried about mudding in a corner bead and being able to feather and sand enough to make the new addition disappear over top the hard-to-replicate texture of existing plaster on the adjacent wall face. Our trusty inspiration, Macy Miller, recommended scribing the drywall and fitting it up to the perpendicular plaster as tight as possible and then laying a bead of caulk down the joint before painting over it all. It saved a lot of time and worked perfectly to avoid what would have probably been a messy and frustrating endeavor. It is a bit of an unconventional approach but so was the situation at hand and from what I’ve researched there shouldn’t be any issues (cracking) in a scenario like this where the house is so old and has already done it’s ‘settling.’
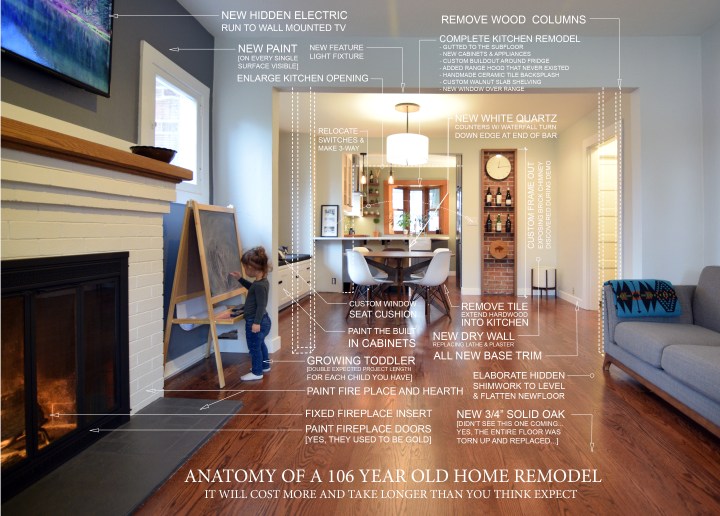
While we still had the protective covering on the flooring we went ahead and replaced all of the base molding and put a fresh coat (sometimes two) on every single surface. This made an especially big difference when we painted the gold fire place doors matte black and the wooden bay window bench cabinets white before adding a custom made 12′ long cushion to make the bay window a prime location for lounging.

The previous owners used an extension cord to power the TV mounted to the chimney above the fire place so we had to run a new line inside color-matched (painted) conduit to a concealed outlet behind a new TV so that no wires are visible.


And then it was time to finally remove the protective layer from the rest of the floors (video 1) and Aubrin was SOOOO EXCITED (video 2).
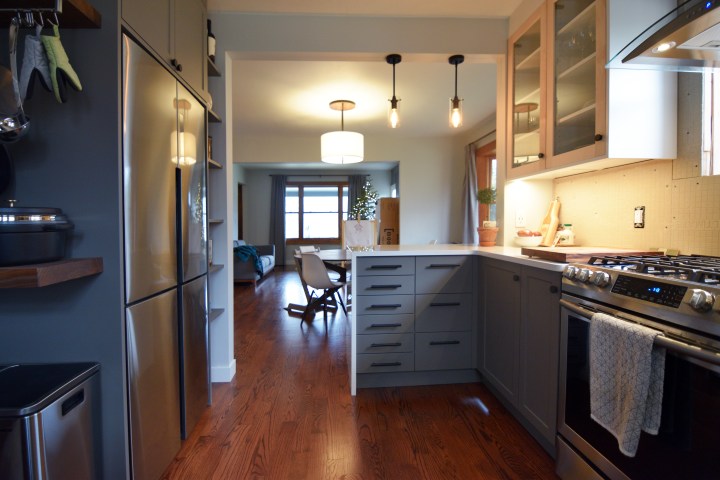
To get the exact aesthetic we wanted for our cabinet fronts we looked beyond IKEA’s limited selection and choose beautiful grey ‘super matte’ doors and drawer fronts from a company called SEMI-HANDMADE which specializes in offering higher quality fronts for IKEA specific cabinetry and mounting hardware. We also ordered a bunch of large panels in the same color for the custom built in shelving around the fridge, except where we used the rest of that 2” thick walnut slab (from the corner ‘L’ shelf project) to create floating shelves for pots and pans. Some heavy duty solid brass (blackened) drawer pulls and door knobs completed the cabinetry and 3 cold rolled steel shelves (raw) finished the exposed brick chimney project in the dining room.


As you may remember from the last post, we also decided to replace the old, single pane, double hung window that was painted shut with a new double pane fixed window. We then commissioned our friends over at Atlas & Cedar to fabricate a blackened steel ‘window liner’ for a modern moment in this old farmhouse. The 8″ deep sill terminates directly into the window glass and once installed, the tile back splash runs right up to the 1/4″ edge profile. Tile to steel to glass.


Speaking of the backsplash…it was perhaps the most daunting project to date for us. Neither of us had ever laid a tile in our life and our first experience doing so would be in the most highly visible and used space in our home. If you’re like me, you know that any mistake will haunt you for years as you see it day in and day out. We wanted to create a feature wall of sorts and highlight the clean window moment and free-hanging range hood. The wall we were tiling had 34 square feet of surface area and 48 linear feet of perimeter which meant that our first ever tile install would require lots of time getting acquainted with the wet tile saw that we borrowed from our friend.
Selecting the tile was almost as daunting as the thought of installing it. We browsed the internet and found plenty of readily available tile but none of them inspired us until we stumbled upon MERCURY MOSAICS, an amazing woman owned conpany employing 30 artisans in a historic warehouse in Minneapolis. Their product is made to order, by hand, with love. Where this adds turn around time to an order, it allows for nearly infinite creative options for clay type, color, glaze sheen, shape and aggregation patterns. We went through a month long selection process with Mercury Mosaics, including communication with the owner herself in which we requested multiple rounds of samples to help us hone in on the perfect option for our needs. They even performed a series of kiln tests on our selected color to see how the glaze could be manipulated at different bake times and temperatures. We settled on a matte finish ‘mid-century Spanish Moss’ ceramic tile in their large hexagon combined with randomly dispersed medium diamonds.


Once the tile arrived we did a dry layout (with the help of Aubrin Sage) and the real work started as new complexities began to arise and we quickly learned that working with hand made tile is not like working with regular mass-produced tile (maybe it is best we didn’t have any prior experience?). Every piece of tile is truly unique, with subtle differences in its glaze, cupping and even it’s shape…What this means is it takes more patience to get the spacing and lippage as uniform as possible, often times swapping out multiple tiles until one fits better than the rest. While the tile does arrive in ‘easy-to-install’ 1 sf sheets we decided to cut them all apart and install the tile piece-by-piece to have better control over the spacing in between tiles and location of the diamonds.


The process was slow and tedious thanks to a cocktail of inexperience and perfectionist tendencies as well as the number of pieces that had to be cut to precises shapes and sizes but after a couple days our vision started to materialize as the tile install wrapped up, only to be confronted with a bout of indecision on grout color.

We had always planned on using a medium/dark grey grout until we did a test piece and thought it looked a touch weird. I was still holding onto the idea of using the grey (partly because I had dipped into the 50.00 bucket of Fusion Pro grout to make the test piece and wouldn’t be able to return it) but after doing a test piece with white per Samantha’s request it was clear that it was going to be a last second switch to white grout.
After half a day of grouting we cleaned up a weeks worth of debris in the kitchen, wiped down the counters and stepped back to take it all in. Warm red oak floors ran into matte grey cabinetry, contemporary in color and traditional in character, supporting a thick white platform of glossy white quartz that runs into matching grout flowing between hexagonal matte finished ceramic tile whose process of creation and installation results in a texture of subtle undulation before terminating into matte white upper cabinetry, steel and walnut. A statement; equal parts bold, yet timeless.
Pro-tip: Install under cabinet lighting. With two brightness settings controlled by a remote we are able to provide ample task lighting at the counters (and highlight the back splash) while keeping the main overhead light off or on low to create a really great ambiance in the kitchen/dining room space.
Even as I sit here in the afterglow of the back splash completion I cringe at the thought of revisiting tile any time soon; unfortunately our master bathroom is the next project on the list…


At this point we consider out kitchen finished. Sure, those upper doors need to be painted white and the shelf and trim on the curved end of the counter have yet to be built/installed and we haven’t decided on paneling for the backside of the peninsula bar but I have a feeling those are the types of tasks that linger for months before eventually getting around to them… and we’ve got A LOT more pressing projects in the queue for this old house.
I could go on about all of the little things we’ve done but the reality is every single surface, appliance, light fixture and switch has been replaced, upgraded and or painted in these three spaces. We want to end this post with a few before/during/after photos of this project so far.


I wish I could say that our plan is to now simply relax and enjoy the spaces but we have already dove into two more substantial projects inside this old house; the back addition and the upstairs master bathroom. We will see how smooth home renovation goes when we are actually living in the house…


Categories: construction, design, Uncategorized

Simple awesome. Well done you three :). Inspiring work and makes me excited fo the possibility of building another house with my partner one day… although I need at least a another year or two in this one (50 square meter small house with loft that we moved into 1 year ago).